
Installation guide for srsRAN 4G/5G & Open5GS Core
Optimization suggestions
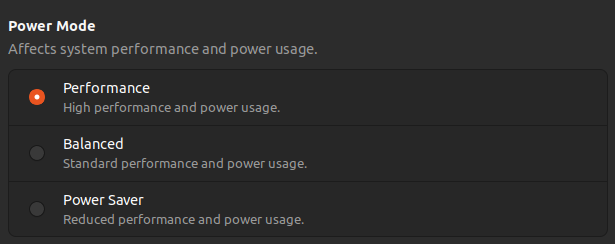
1) Go to Settings » Power » Select Performance mode
2) Check the number of cores in your device. This will prove to be useful later in the software installation.
Go to Settings » About. It will display the type of processor and the number of cores in the format processorName x coreNumber.
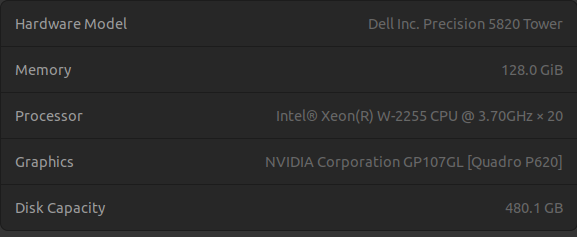
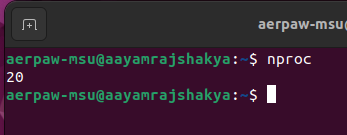
For my device, the number of cores available is 20.
Alternatively, you can check the cores via terminal as well.
Let's get started
To keep things organized, create a folder called srsRAN_main and install everything inside it.
mkdir srsRAN_main
cd srsRAN_main
1) Install USRP Hardware Driver (UHD)
# Setting up dependencies for UHD

sudo apt-get install autoconf automake build-essential ccache cmake cpufrequtils doxygen ethtool \
g++ git inetutils-tools libboost-all-dev libncurses5 libncurses5-dev libusb-1.0-0 libusb-1.0-0-dev \
libusb-dev python3-dev python3-mako python3-numpy python3-requests python3-scipy python3-setuptools \
python3-ruamel.yaml
Clone the github repo to the srsRAN_main folder:
git clone https://github.com/EttusResearch/uhd.git
Build and install UHD:
cd uhd/host
mkdir build
cd build
cmake ../
make      # Remember we talked about core previously? We can rewrite the command as 'make -j(nproc*2)', or 'make -j40' in my case.
          # This addition uses all the available cores, speeding up the installtion.
sudo make install
sudo ldconfig
To check if UHD is correctly installed, try:
uhd_config_info --version
2) Install libZMQ and cZMQ
⚠️ Warning: You should always install ZMQ and other dependencies prior to installing srsRAN 4G/5G to make sure everything works fine.
sudo apt-get install libzmq3-dev
Install libZMQ
cd ~/srsRAN_main
git clone https://github.com/zeromq/libzmq.git
cd libzmq
./autogen.sh
./configure
make    # make -j(nproc*2)
sudo make install
sudo ldconfig
Install cZMQ
cd ~/srsRAN_main
git clone https://github.com/zeromq/czmq.git
cd czmq
./autogen.sh
./configure
make    # make -j(nproc*2)
sudo make install
sudo ldconfig
3) Build srsRAN 4G
Before we proceed, we need to install all required dependencies:
sudo apt-get install build-essential cmake libfftw3-dev libmbedtls-dev libboost-program-options-dev libconfig++-dev libsctp-dev
Installation from source
cd ~/srsRAN_main
git clone https://github.com/srsRAN/srsRAN_4G.git
cd srsRAN_4G
mkdir build
cd build
cmake ../
make    # make -j(nproc*2)
sudo make install
srsran_install_configs.sh user
Put extra attention in the cmake console output. Make sure you read the following line:
...
-- FINDING ZEROMQ.
-- Checking for module 'ZeroMQ'
--   No package 'ZeroMQ' found
-- Found libZEROMQ: /usr/local/include, /usr/local/lib/libzmq.so
...
(Check for the same while installing srsRAN 5G)
4) Build srsRAN 5G
Install required dependencies:
sudo apt-get install cmake make gcc g++ pkg-config libfftw3-dev libmbedtls-dev libsctp-dev libyaml-cpp-dev libgtest-dev
Installation from source
cd ~/srsRAN_main
git clone https://github.com/srsRAN/srsRAN_Project.git
cd srsRAN_Project
mkdir build
cd build
cmake ../ -DENABLE_EXPORT=ON -DENABLE_ZEROMQ=ON
make    # make -j(nproc*2)
sudo make install
5) Install Open5GS Core
⚠️ Warning: Make sure to pay attention to console output while you’re installing Open5GS. If you ignore any errors, it could be difficult to understand what went wrong later on.
Getting MongoDB
(You have to install curl for this step: sudo apt/snap install curl)
sudo apt update
sudo apt install gnupg
curl -fsSL https://pgp.mongodb.com/server-6.0.asc | sudo gpg -o /usr/share/keyrings/mongodb-server-6.0.gpg --dearmor

# For Ubuntu 22.04
echo "deb [ arch=amd64,arm64 signed-by=/usr/share/keyrings/mongodb-server-6.0.gpg] https://repo.mongodb.org/apt/ubuntu jammy/mongodb-org/6.0 multiverse" | sudo tee /etc/apt/sources.list.d/mongodb-org-6.0.list
Install MongoDB packages
sudo apt update
sudo apt install -y mongodb-org
sudo systemctl start mongod (if '/usr/bin/mongod' is not running)
sudo systemctl enable mongod (ensure to automatically start it on system boot)
Install Open5GS
sudo add-apt-repository ppa:open5gs/latest
sudo apt update
sudo apt install open5gs
Install the WebGUI of Open5GS
# Download and import the Nodesource GPG key
 sudo apt update
 sudo apt install -y ca-certificates curl gnupg
 sudo mkdir -p /etc/apt/keyrings
 curl -fsSL https://deb.nodesource.com/gpgkey/nodesource-repo.gpg.key | sudo gpg --dearmor -o /etc/apt/keyrings/nodesource.gpg

 # Create deb repository
 NODE_MAJOR=20
 echo "deb [signed-by=/etc/apt/keyrings/nodesource.gpg] https://deb.nodesource.com/node_$NODE_MAJOR.x nodistro main" | sudo tee /etc/apt/sources.list.d/nodesource.list

 # Run Update and Install
 sudo apt update
 sudo apt install nodejs -y
Now install WebUI of Open5GS:
curl -fsSL https://open5gs.org/open5gs/assets/webui/install | sudo -E bash -
6) Configure Open5GS Core
Register Subscriber Information
Connect to http://localhost:9999 and login with admin account.
Username : admin
Password : 1423
To add subscriber information, you can do WebUI operations in the following order:
1) Go to Subscriber Menu
2) Click + Button to add a new subscriber
3) Fill the IMSI, security context(K, OPc, AMF), and APN of the subscriber (ue_zmq.conf)
4) Change dns/apn to srsapn
5) Click SAVE Button
6) Restart the WebGUI to update the new subscriber information
Make changes to config files
After installing everything, we need to make certain changes to the config files in gnB and UE to match that of the core.
If correctly installed, config files for the open5GS core should be at directory /etc/open5gs/
a) nrf.yaml
Modify /etc/open5gs/nrf.yaml to set the Serving PLMN ID
nrf:
    serving:  # 5G roaming requires PLMN in NRF
-      - plmn_id:
-          mcc: 999
-          mnc: 70
+      - plmn_id:
+          mcc: 001
+          mnc: 01
   sbi:
     server:
       - address: 127.0.0.10
Restart open5gs-nrfd for these changes to take effect:
sudo systemctl restart open5gs-nrfd
b) amf.yaml
For this step, you need to download gnb_zmq.yaml (from srsRAN 5G documentation).
1) Open amf.yaml from /etc/open5gs/ and open gnb_zmq.yaml in a different terminal.
2) Change the amf addr and bind_addr under amf in the gnb_zmq.yaml file to match the address under amf->ngap in the amf.yaml file.
3) Set the tac value in amf.yaml to 7 and the plmn id to 001 01:
     guami:
       - plmn_id:
-          mcc: 999
-          mnc: 70
+          mcc: 001
+          mnc: 01
         amf_id:
           region: 2
           set: 1
     tai:
       - plmn_id:
-          mcc: 999
-          mnc: 70
+          mcc: 001
+          mnc: 01
-        tac: 1
+        tac: 7
     plmn_support:
       - plmn_id:
-          mcc: 999
-          mnc: 70
+          mcc: 001
+          mnc: 01
         s_nssai:
           - sst: 1
     security:
4) Restart open5gs-amfd for these changes to take effect:
sudo systemctl restart open5gs-amfd
7) Connect gNB and UE
1) Move the gnb_zmq.yaml file to the following directory:
srsRAN_main/srsRAN_Project/build/apps/gnb/
2) Move the ue_zmq.conf file to the following directory:
srsRAN_main/srsRAN_4G/build/srsue/src
3) Create an appropriate network namespace:
sudo ip netns add ue1
To verify the new “ue1” network namespace exists, run:
sudo ip netns list
4) Go to the locations where you moved those two files to and open the terminals side by side:
# Run the gNB
cd srsRAN_main/srsRAN_Project/build/apps/gnb
sudo ./gnb -c ./gnb_zmq.yaml

# Run the srsUE
cd srsRAN_main/srsRAN_4G/build/srsue/src
sudo ./srsue ue_zmq.conf
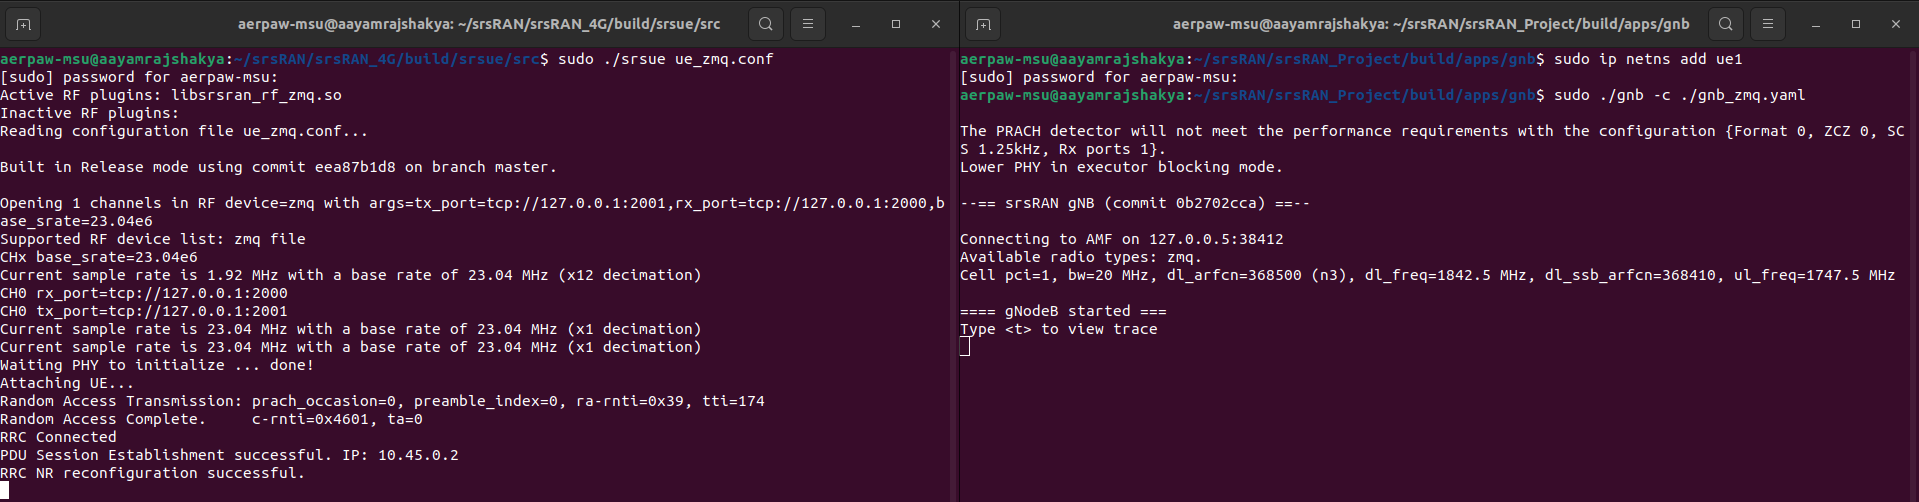 It is clear that the connection has been made successfully once the UE has been assigned an IP, this is seen in
 PDU Session Establishment successful. IP: 10.45.0.2. The NR connection is then confirmed with the RRC NR reconfiguration successful message.
5) Generate traffic to test the connection
Ping
sudo ip netns exec ue1 ping <UE_IP>
ping <UE_IP>
Iperf
iperf3 -s -i 1
UE side
sudo ip netns exec ue1 iperf3 -c 10.45.0.1 -b 10M -i 1 -t 60
Installation walkthrough:
Troubleshooting:
Ideally, your network should be up by running those commands; however, there might be minor issues:
1) Command ./gnb not found or ./srsue not found
This usually means that you are trying to run gnb or srsue from the wrong directory where all the necessary objects and files are not located. Can be fixed by moving to the right directory. Also make sure that the config files are in the same place.
2) gnB not being able to connect to the core. Something like:
Lower PHY in executor blocking mode.
--== srsRAN gNB (commit 5e6f50a20) ==--
Connecting to AMF on 127.0.0.5:0. Cannot connect
In this case, it most likely is a configuration issue. Either the amf address doesn’t match or the other values doesn’t match. Check everything again.
3) UE not getting IP
Another configuration issue. Most likely the UE info from the ue_zmq config file like the imsi, opc or other stuff we had to put into the subscriber information does not match. Check again and try to fix it.
4) It is always a good idea to restart the core components if there is any issue:
sudo systemctl restart open5gs-mmed
sudo systemctl restart open5gs-sgwcd
sudo systemctl restart open5gs-smfd
sudo systemctl restart open5gs-amfd
sudo systemctl restart open5gs-sgwud
sudo systemctl restart open5gs-upfd
sudo systemctl restart open5gs-hssd
sudo systemctl restart open5gs-pcrfd
sudo systemctl restart open5gs-nrfd
sudo systemctl restart open5gs-scpd
sudo systemctl restart open5gs-ausfd
sudo systemctl restart open5gs-udmd
sudo systemctl restart open5gs-pcfd
sudo systemctl restart open5gs-nssfd
sudo systemctl restart open5gs-bsfd
sudo systemctl restart open5gs-udrd
sudo systemctl restart open5gs-webui
###############################################################
sudo systemctl restart open5gs-*    # Restart all components
###############################################################
5) Failed to setup/configure GW interface
Sometimes, during a PC failure or sudden power outage, the srsUE setup might be interrupted, resulting in the loss of the network namespace. In such cases, the user should restart the core network and add the UE again. There appears to be a timer mechanism that is triggered when the core network connection is inactive for a specific duration, leading to the removal of the network namespace ue1.